4. Profile Synchronization
After you have created profile properties, user sub-types, and audiences,
you need to configure the synchronization of the users and profile
properties from a directory services source running within the
enterprise. In the following sections, you will review how to configure
synchronization connections, set up incremental scheduled jobs, and
explore other synchronization features.
Before you proceed with the
creation of a new synchronization connection, however, you need to start
the User Profile Synchronization service on one of the servers in the
farm and associate this service with the user profile application that
would be using this synchronization service.
4.1. Starting User Profile Synchronization Service
To start the User Profile Synchronization Service, perform the following steps.
Open a browser and go to the SharePoint Central Administration website.
Under System Settings, click Manage Services On Server.
On the Services On Server page, select the server you want to start the synchronization service from the Servers drop-down list.
Click the Start link on the row corresponding to the User Profile Synchronization Service.
On the next page, select the user profile application to which you want to associate the service and click OK.
After the User Profile Service is started, navigate to Services.msc and ensure that the following services are running.
Perform an iisrest command to restart IIS services and complete the provisioning on the User Profile Service.
4.2. Creating New Profile Synchronization Connection
To create a new profile synchronization connection, complete the following steps.
Open a browser and go to the SharePoint Central Administration website.
Under Application Management, click Manage Service Applications.
Select the User Profile Service Application you want to edit.
Click the Manage button under the Operations group.
Under Synchronization on the Manage Profile Service page, click Configure Synchronization Connections.
On the Synchronization Connections page, click Create New Connection.
On the Add New Synchronization Connection page shown in Figure 21, provide the following information to create a new synchronization connection.
In
the Connection Settings section, provide the information required to
make a connection for the synchronization process. The connection
settings section changes based on the type of provider selected. For
example, if you use Active Directory as your enterprise directory
service, you will need to provide the following information.
Forest Provide the name of the forest with which you want to synchronize data.
Domain Controller
You can provide a domain controller name in the text box if you have a
preferred domain controller, or you can choose Auto Discover Domain
Controller to let SharePoint discover one.
Authentication Provider
Choose the authentication provider you want to use for this connection.
Because SharePoint 2010 allows claim-based and forms-based
authentication, this information is required at the synchronization
setup so that required user IDs can be pulled from the system for
identification. For this example, use Windows Authentication.
Provide the Username and Password that has the required permissions to fetch the user profile. For Active Directory, this account should have Replicate Directory Changes permissions to synchronize data.
Select the Use SSL-Secured Connection check box if you want to use SSL.
SharePoint
2010 has a new feature that allows multiple organizational units (OUs)
to be used to pull information in a single connection. This can be
achieved by clicking Populate Container and selecting the required OUs
at the bottom of the Add New Synchronization Connection page.
Click OK to create the connection.
4.3. Editing Profile Synchronization Connection Filters
SharePoint 2010 lets you
filter the data that is returned from the enterprise directory services.
Although this feature was available in SharePoint Server 2007 as a text
box in which you could type in the name of the required filter,
SharePoint 2010 provides an Edit Connection Filters page through which
you can create these filters.
To create a filter for a User Profile Synchronization connection, perform the following steps.
Open a browser and go to the SharePoint Central Administration website.
Under Application Management, click Manage Service Applications.
Select the User Profile Service Application you want to edit.
Click the Manage button under the Operations group.
On the Manage Profile Service page, click Configure Synchronization Connections under the Synchronization section.
On the Synchronizations Connections page, click the connection for which you want to configure the filter.
Select Edit Connection Filters from the drop-down list of the selected item.
On
the Edit Connection Filters page, you can set up the filters on user
attributes or group properties. Select the required filters in either of
the sections and click Add.
4.4. Creating an Organization Profile
In this section you will look
at how you can create a new organization profile. An organization
profile is a new feature of SharePoint 2010 through which a group or
team can have its own profile in the SharePoint system that has all the
features of a user profile.
To create a new organization profile, perform the following steps.
Open a browser and go to the SharePoint Central Administration website.
Under Application Management, click Manage Service Applications.
Select the User Profile Service Application you want to edit.
Click the Manage button under the Operations group.
On the Manage Profile Service page, click Manage Organization Profiles under the Organizations section.
On the Manage Organization Profiles page, click the New Profile link.
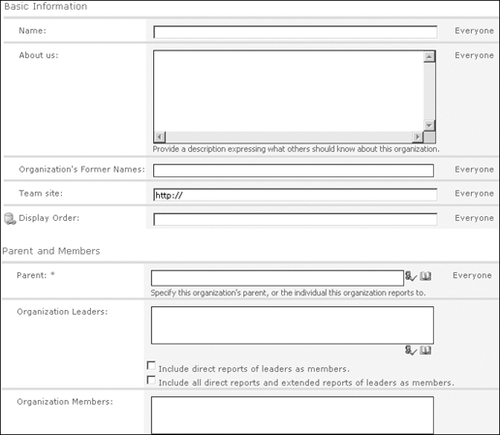
On the Add Organization Profiles page, provide the following information to create a new organization profile, as shown in Figure 22.
Name Type the name you want to give to the organization profile.
About Us In this section, you can write a brief description about the profile.
Organization’s Former Names Add any former names by which the organization was called.
Team Site Here you can provide the URL of the site (if there is one) for the organization or team for which you are creating this profile.
Parent Type the name of the person or organization in the enterprise reporting hierarchy to which this new organization reports.
Organization Leader In this section, you can provide the list of all users who act as leaders in this new organization.
Organization Members In this section, you can add all the users who will be the members of this organization.
Click Save And Close to add this new organization profile.
5. Setting Up My Sites
In the following sections, you will look at the steps that enable the My Site feature of the User Profile Service application. Setting up My Sites for users to use is a two-stage process. The first stage involves configuring
the My Site settings; in the second stage, you grant permissions to
allow users to use the My Site and social features.
5.1. Configuring the My Site Settings
To configure the My Site settings, complete the following steps.
Open a browser and go to the SharePoint Central Administration website.
Under Application Management, click Manage Service Applications.
Select the User Profile Service Application you want to edit.
Click the Manage button under the Operations group.
On the Manage Profile Service Page, click Setup My Sites under the My Site Settings section.
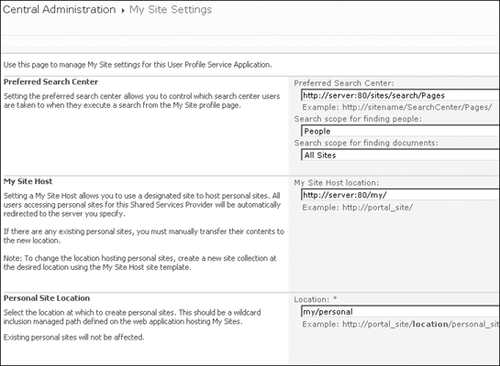
On the My Site Settings page, enter the following setup information, as shown in Figure 23.
Preferred Search Center Specify the search center to which the user will be taken when she begins a search from the My Site Search page.
My Site Host
Specify the site under which the user’s My Site will be created. All
users who have My Site service provided by this user profile application
will have their My Sites located under this site.
Personal Site Location Specify a managed path under which the user’s My Site will be created.
Site Naming Format Choose one of the specified formats to determine how the users’ My Sites will be named.
Language Options Select this check box if you want the users to choose the language of their My Sites.
Read Permission Level Specify the users or groups who will have read access to the user’s My Sites.
My Site E-mail Notifications Specify the sender’s name for all My Site e-mail notifications.
Click OK to complete the settings.
5.2. Configuring User Permissions
To configure user permissions for the My Sites feature, complete the following steps.
Open a browser and go to the SharePoint Central Administration website.
Under Application Management, click Manage Service Applications.
Select the User Profile Service Application you want to edit.
Click the Manage button under the Operations group.
On the Manage Profile Service page, click Manage User Permissions under the People section.
On the Permissions For User Profile Service Application dialog box, as shown in Figure 24, type the user names or groups to whom you want to grant permissions to use My Site and user social features.

Click Add and select Use Personal Features, Create Personal Sites, and Use Social Features to grant the required permissions.